
- How to Crop a Picture in PowerPoint
- How to crop a picture into a circle in PowerPoint
- Cropping to fit or fill a shape in PowerPoint
- Cropping multiple pictures in PowerPoint
- Adjusting a cropped image in PowerPoint
- Intersecting a picture into a shape in PowerPoint
- Cropping a picture to an aspect ratio in PowerPoint
- Cropping Images to Create 3D pictures (or Pop-Up Images) in PowerPoint
- Conclusion
How to Crop a Picture in PowerPoint


Images make a presentation more interesting as they break the monotony of text. However, adding pictures isn’t as simple as copying and pasting or inserting pictures saved on your computer. Well, it is, but not if you want to make your presentation aesthetically pleasing. That involves using the right images, editing, and cropping them just right. For that, you need to know how to crop in PowerPoint.
It is important to know how to trim and crop out the unnecessary portions of an image or to crop a picture into a different shape from its original.
You can crop shapes in PowerPoint to have more control over your pictures and add some zing to your slides. So, what can you do with images?
- Crop the image into different shapes
- Crop it into definitive aspect ratios so that they fit better on your slides
- Crop out parts not required and reduce the size of the image file.
How to Crop a Picture in PowerPoint
Here is how to crop an image in PowerPoint:
- Select the image to be cropped
- Open the Picture Format tab
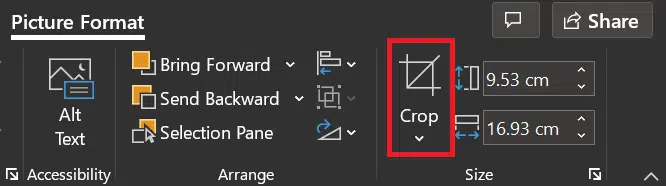
- Click on Crop
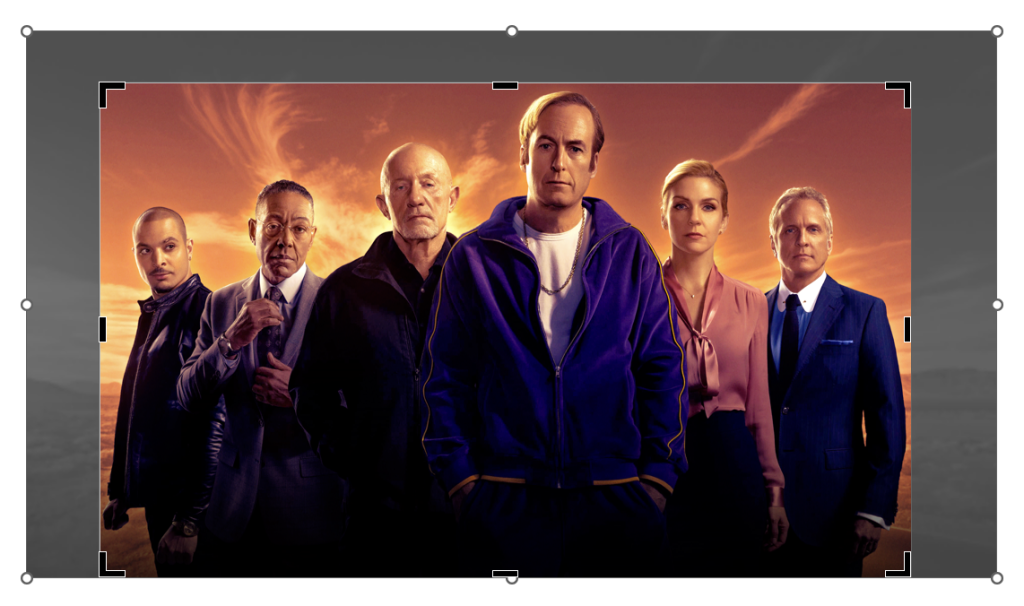
- Look for the black cropping handles
- Resize them as you want
- Choose Crop once more or press the Esc key to leave cropping mode
After resizing the image, you will see certain parts washed out – that is the portion you’ve cropped out. The colored portion you see is the image that remains after cropping.
Cropping is especially useful when you have several images in your presentation, as it helps you to decrease the size of your PowerPoint files. You can also compress the images after cropping them to reduce your file size further.
Please remember that if you use an online image, you need to cite it properly in the presentation to avoid copyright infringement.
How to crop a picture into a circle in PowerPoint
You don’t have to retain your image in the same shape as the original; you can crop a rectangular image into a circle – or any other shape, like a triangle. Here is how to make a picture round in PowerPoint:
- Select the image to be cropped
- Open the Picture Format tab
- Click on the arrow below Crop
- Select the Crop to Shape command
- Choose the shape you want – say, Oval, from the drop-down menu
- Drag the handlebars to resize as you want to
- Click on crop once more or press Esc to finish
Cropping a rectangular image into a circle will make it resemble an oval shape. If you want to crop a picture into a circle, choose a square-shaped image – as it has the same measurements for all sides, it will become a circle.
How to crop a picture into a perfect circle in PowerPoint
To crop a picture into a circle, first, you need to first click on the image, click on Picture Format, click on the arrow below Crop, select Crop to Shape, and select the Oval shape. Now to crop the image into a circle:
- Click on the image and the arrow under Crop again
- In the drop-down menu, find Aspect Ratio, and under Square, choose 1:1
- The image will now get cropped into a perfect circle.
That is how to make a picture circular in PowerPoint.
Cropping to fit or fill a shape in PowerPoint
You can also use an image to fill a shape. Here is how to do it:
- Insert a shape by going to Insert > Shapes
- Click on the shape of your choice, and on the slide, adjust the handlebars to get the size you want
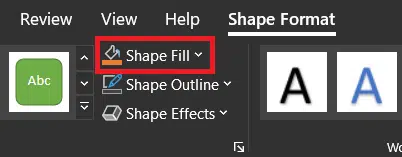
- Click on the shape and then select Shape Format from the toolbar
- In Shape Styles, and choose Shape Fill
- Click on Picture
- Select the image of your choice – either an online image or one stored on your computer, and click Insert
- Your selected image will get filled inside the shape. You can also click on Shape Outline and select No Outline to get transparent outlines.

- To crop it further, select the image inside the shape
- Click on Picture Format from the toolbar
- Select Crop and resize the image as you want to
Remember to use the Fill option to set the size of the image to match the height or breadth of the shape and fill the shape with the picture. You can find this by clicking on the image, going to Picture Format, and clicking on the drop-down below Crop.
Fill sets the picture size to match the shape’s height or width, whichever is greatest. This fills the shape with the picture.
If you choose the Fit option, it will configure the size of the image so that its height and breadth match the boundaries of the shape and fits as much of the image into the shape as it can and may leave certain areas of the shape empty.
Dragging the image will change what portion of it stays inside the shape.
Cropping multiple pictures in PowerPoint
Using the SmartArt feature, you can save significant time and effort and crop multiple pictures in PowerPoint simultaneously. Please remember that this feature is only available in PowerPoint 2013 or later.
These are the steps to follow:
- Select the images
- Open the Picture Format tab
- Click on the Picture Layout dropdown menu
- Choose a layout in SmartArt for cropping the pictures

To get an idea of how the images will appear after cropping and resizing, get a preview by hovering over each layout. Identify the shape that makes your image closest to the shape you really want. You can further adjust the shape later.
After you choose a layout, you can then break the SmartArt graphic apart so that you can freely work with the cropped pictures.
You need to ungroup the elements of the SmartArt to do this. After selecting the SmartArt, press Ctrl + Shift + G twice to break or ungroup the SmartArt graphic. You can also use the Convert to Shapes command option:
- Select the SmartArt graphic
- Open the SmartArt Design tab
- Click on the Convert dropdown menu
- Choose Convert to Shapes
Now your SmartArt graphic is a group of pictures that are cropped. You can break them apart and use them the way you want in the presentation.
Another way to crop multiple images in PowerPoint:
- Click on all the pictures you want to crop by pressing the Ctrl key
- Open Picture Format tab
- Click on the drop-down below Crop
- Click on Crop to Shape
The crop will be applied to all the pictures you have selected.
But what happens if some of the pictures don’t get cropped as per your choice?
Adjusting a cropped image in PowerPoint
Select your photo and click the Crop command to adjust your image inside the cropped area. These are the steps to follow:
- Select your cropped image
- Open the Picture Format tab
- Click on the Crop tool
- Click and drag the image, or resize the handlebars on the edges of the image to move the picture within the frame, and adjust it as you want it to appear
- Click on Crop again or click on the Esc key to get out of the cropping mode
You can also use the Offset X and Offset Y functions in the dialogue box in Format Picture in case your image inside the cropped circle is not centered properly. Here are the steps to follow:
- On your image, right-click and choose the option Format Picture
- Select the Picture icon
- Under the crop portion, adjust the fields for both Offset X and Y
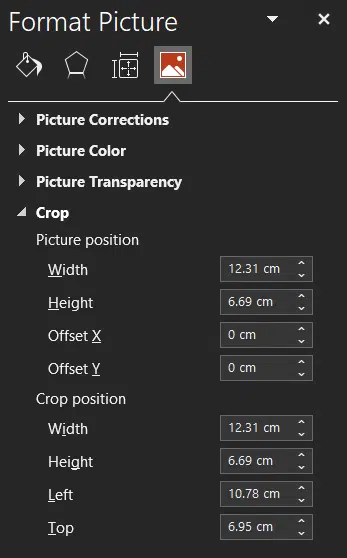
To move your image in a horizontal direction, adjust the Offset X value, and to move your image vertically, change the Offset Y value.
Intersecting a picture into a shape in PowerPoint
The Intersect command is very useful for cropping an image to shape – this is available in PowerPoint version 2013 onward. Without manually adjusting, you can simply draw the shape you want directly on the portion of the image you want to crop into shape. Here are the steps you need to follow:
- Select the image
- Press the Shift key and select the shape
- Open the Shape Format tab
- Click on Merge Shapes
- Click on Intersect
- Now the points of intersection between the chosen shape and your image get combined
Cropping a picture to an aspect ratio in PowerPoint
The Aspect Ratio tool in cropping allows you to convert your photo into a visual image in full screen to be used as the slide background. For printed slides, you can use the 4:3 ratio, and for widescreen monitors, you can crop it to the 16:9 ratio.
Here are the steps to follow to crop a picture into the ratio of your choice:
- First, select the image to be cropped
- Open the Picture Format tab
- Click on the Crop menu
- From the dropdown, choose Aspect Ratio
- Select the aspect ratio – 16:9 or 4:3
- Resize the image if required
- Adjust the image within the frame if needed
- Click on crop once more or the Esc key to finish
This feature is best to use on images with plenty of negative space – like the sky, sand, water, etc., as it leaves you with sufficient space in the image to crop out and still leave you with a complete picture. You can also place your content in the negative space. Cropping images without negative spaces to aspect ratio will enlarge the size of the main objects in your image.
Cropping Images to Create 3D pictures (or Pop-Up Images) in PowerPoint

PowerPoint offers a really neat feature that lets you make images appear in 3D. What you basically need to do is overlay two images and use the crop tools in PowerPoint to render a 3D effect. Here are the steps to follow to achieve that:
- Choose an image of high quality (full image, high contrast)
- Frame the image correctly in PowerPoint
- Duplicate the image by using Copy + Paste or pressing Ctrl + D and take it to the right side

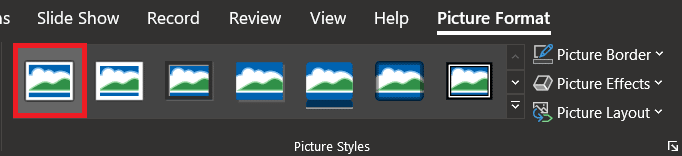
- Select the original image and open the Picture Format tab
- In Picture Styles, choose the simple white frame to make the image appear like a photo

- Open Crop menu
- Choose Crop to Shape -> Trapezoid
- Adjust the Trapezoid angle to see the entire shape that you want to see popping out for the 3D effect.

- Click on the yellow diamond at the top of the shape with the mouse and adjust the trapezoid angle to fit your image.
- Open the Crop menu to add the black dash lines around the picture
- Pull down the black lines that frame the image to crop out most of the image – just below where it will pop out. Depending on how much you want the image to pop out, you can crop it.

- Select the second picture and move it to the center of the screen

- Open Picture Format
- Select Remove Background
- Use Mark Areas to Remove and Mark Areas to Keep to frame the main object precisely, and the rest gets colored magenta
- Click on Keep Changes when you finish

- Place the image whose background you removed on top of the cropped image
- Align them properly
Your 3-D image is ready.
Conclusion
So, there you have it! You can use the method you prefer to crop your images and then add them to your slides to make a killer presentation!
Related Articles
-
 April 22nd, 2022
How To Create the Best PowerPoint Presentation Background
PowerPoint How To -
 June 27th, 2022
How to Compress PowerPoint Presentations
PowerPoint How To -
 June 26th, 2024
How to Create PowerPoint Slides Faster
Blog Post