
- How to convert PowerPoint to Word on Windows?
- How to convert PowerPoint to Word on Mac?
- How to Edit Linked PowerPoint Slides in Microsoft Word?
- What happens when you change the PowerPoint location or rename it?
- How to Update a Linked PowerPoint Slide in Word?
- How to Break Linked PowerPoint Slides in Word?
- How to Insert PowerPoint into Word (as an embedded presentation)?
- Limitation of Converting PowerPoint to a Word Document
How to Convert PowerPoint to a Word Document?

In many cases, while taking a presentation, the audience must be given seminar notes or handout materials for reference. Often, the audience is given a print of the slides from the presentation. But, it may not be the most desirable form of handout since the presentation could have unnecessary graphics like audio icons, videos, 3D models, images, and more. The best possible solution is to convert PowerPoint to Word.
By doing that, you will get all the content in Microsoft Office Word format. You can edit it easily since it is a Word document. You may add additional information, work on the formatting, or even convert the presentation into a note-taking guide.
So, how do you convert a PowerPoint presentation to a Word document? Read this step-by-step guide to find out how.
Table of contents
- How to convert PowerPoint to Word on Windows?
- How to convert PowerPoint to Word on Mac?
- Points to note about the Paste link Option
- How to View linked PowerPoint Slides in Microsoft Word?
- What happens when you change the PowerPoint location or rename it?
- How to Update a Linked PowerPoint Slide?
- How to Break Linked PowerPoint Slides in Word?
- How to Insert PowerPoint into Word (as an embedded presentation)?
- How to Tackle the Huge File Size after Converting PowerPoint to a Word Document?
- Limitation of Converting PowerPoint to a Word Document
- Conclusion
How to convert PowerPoint to Word on Windows?
Follow these easy steps to turn a PowerPoint presentation into an editable Word document on Windows:
- Open the PowerPoint presentation you wish to convert into a Word document.
- Click on the File tab placed in the left-hand corner of the toolbar.
- This action opens an area where you can select the Export option from the panel on the left side.
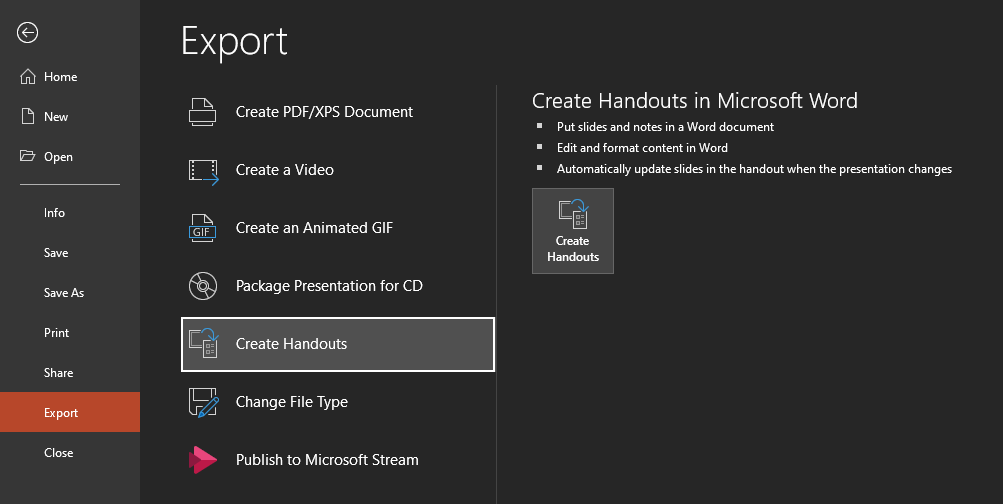
- A set of exporting options will appear on the subsequent screen where you can choose the option – Create Handouts.
- Further, select the Create Handouts button placed on the right side.
- This opens a pop-up with the title Send to Microsoft Word? It has 5 different page layout options mentioned as Page layout in Microsoft Word. They are: Notes next to slides, Blank line next to slides, Notes below slides, Blank lines below slides, Outline only
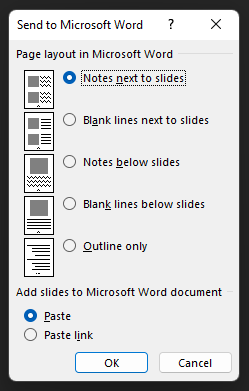
You can choose an option from these based on your requirement. Similarly, it has 2 different pasting options under Add slides to Microsoft Word document as Paste and Paste link. The former option lets you paste the contents on the Word document without linking it to the source PowerPoint presentation. Any change to the PowerPoint presentation will not be reflected in the Word document. In fact, you will have to export your slides all over again to accommodate any new changes from the PowerPoint. But, if you want all the subsequent changes reflected on the Word file, choose the latter.
- After you finalize the page layout and the pasting option, click the OK button.
- This action opens a Word document in a new window. All the contents from the PowerPoint presentation can be seen in the Word document. You can edit the contents, adjust the formatting, save it or directly print it thereafter.
- You might sometimes get an error message “PowerPoint couldn’t write to Microsoft Word”. This is a common bug. To resolve this, restart your computer and open PowerPoint and try again. It should work when PowerPoint is the only app running, so make sure you don’t have any other apps open or running in the background.
How to convert PowerPoint to Word on Mac?
Use the following quick steps to convert PowerPoint to Word on Mac.
- Start with opening the PowerPoint presentation you wish to convert into a Word document.
- Like on Windows, click on the File tab from the left-hand corner of the toolbar.
- Choose the Export option from the drop-down menu.
- Now, you can name your file in the Save As text box and finalize a location to store it within the computer. Select the Rich Text Format (.rtf) option under File Format.
- Click the Export button to save the PowerPoint as a new .rtf document.
- Further, open Microsoft Word, click the Open tab on the left panel, and locate the .rtf document.
- Select the file and click the Open button in the bottom right corner to convert it into a Word document.
Points to note about the Paste link Option:
- Only the PowerPoint thumbnails are linked to Word.
Only the PowerPoint thumbnails get exported when you use the Paste link option to export PowerPoint to Word. This means if you have Speaker Notes written beneath the slides that were updated after the export process, these new changes won’t get updated in the Word document. In such cases, you will have to export the PowerPoint presentation to Word again.
- The Word thumbnails are only usable within Word.
Do not be under the impression that if you delete slide thumbnails in Word or tweak it a little bit, the changes will get reflected on PowerPoint. Any such change won’t be reflected and will be overwritten when PowerPoint pushes its latest updates back to Word.
How to Edit Linked PowerPoint Slides in Microsoft Word?
Once you have converted PowerPoint slides to Microsoft Word, you might want to view the PowerPoint slides within Word.
In Word, click on the File tab, choose the Info option, and select Edit Links to Files on the right side.

This action will open a dialogue box where you can update, edit, and manage files linked to the Word document. Here’s a little information about all the options from this dialogue box:
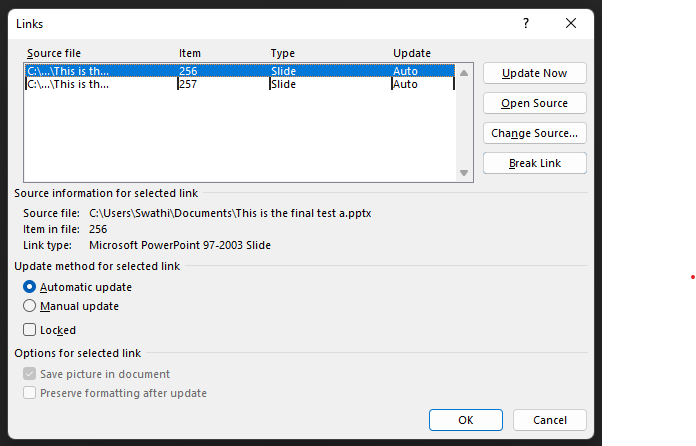
Update Now: This option will update and save the Word document as per its linked PowerPoint file. Although the changes get updated by default as you save the PowerPoint, this option is useful because you will have control when it happens in Word.
Open Source: Literally “open the source PPT file”. Sometimes, you might have lost the source PowerPoint file on your computer. In such a case, you can skip searching for the file and use this option. It quickly opens the source PowerPoint file that was originally used.
Change Source: Use this option if you want to change the source PPT file to another file.
Also, note that the file name of the PowerPoint file and Word document shouldn’t change to maintain an active link between them.
Break Link: With this option, you can break the PowerPoint to Word links for individual slides. However, this action won’t update in Word as you edit it in PowerPoint.
Update method for selected link: The options under this will let you choose if the files need to be updated automatically or manually.
What happens when you change the PowerPoint location or rename it?
If you change the location of the PowerPoint file within your computer or rename it, you will get the following error: This object is corrupt or no longer available. To remove this error, use the Change Source option mentioned above to re-locate the file.
How to Update a Linked PowerPoint Slide in Word?
Here are 2 ways to update a linked PowerPoint slide.
Method 1: Right-click the slides in Word
Right-click on the thumbnail picture you want to update in Word, and click Update Link. This action converts only the selected PowerPoint slide and not all the slides from the presentation.
Method 2: Use the option Edit Links to Files
Click on the File tab, choose the Info option, and click on Edit Links to Files. Choose the slide you want to update, and click on Update Now, followed by OK.
You can choose more slides and update them in Word if you want using this method.
How to Break Linked PowerPoint Slides in Word?
To break the link between the Word document and the PowerPoint slides, go to the File tab, choose the Info option, and click on Edit Links to Files. Now, choose the slide whose link needs to be broken, and click on Break Line followed by OK.
If you wish to remove all links from all the slides, drag and select all the links using your mouse. Then click on Break Link and press Yes on the pop-up and OK.
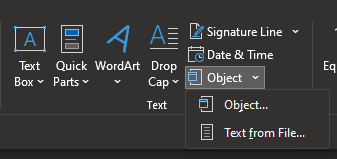
How to Insert PowerPoint into Word (as an embedded presentation)?
Instead of converting the PowerPoint file to a Word document, you can embed your presentation inside Microsoft Word. Start by going to the Insert tab in MS Word, click the Object dropdown menu, and choose Object from it.
Click on Object from the drop-down menu, and you should get this pop-up:
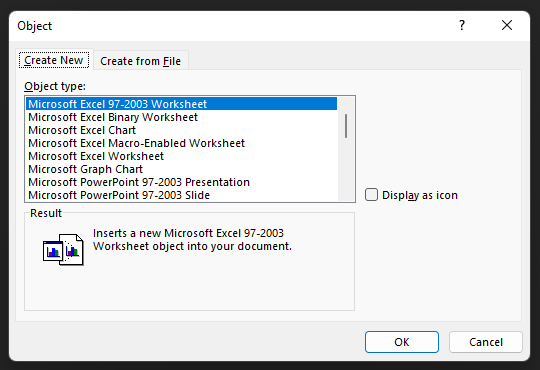
Now, click Create from file and Browse to find your PowerPoint file.
Further, click on Link to File followed by OK. This action embeds the PowerPoint presentation on the Word document.
Issue: After converting PowerPoint to Word, the file is large [SOLUTION]
Often the file size can increase enormously after converting PowerPoint to a Word document. This might be an issue for many who wish to share the document with others via email or any other transferring method. The quick and simple fix to this is by compressing the Word file. You can start by selecting a picture on the file, clicking on Picture Format, and clicking Compress. Similarly, you can select another picture and perform the same steps. It is similar to compressing PowerPoint files. We have a detailed article on how to compress PowerPoint presentations for you to refer to.
Limitation of Converting PowerPoint to a Word Document
Although there are these many techniques to convert PowerPoint to a Word document, you need to know that the contents of your slides cannot be converted into a native Word document. These can be text boxes, shapes, SmartArt graphics, etc. If you wish to have that on your Word document, it must be manually copied and pasted from each slide.
Conclusion
That was it! This was a step-by-step guide to the different ways of converting a PowerPoint file to a Word document. We have explained methods from multiple routes, and also explained ways to break the links whenever you want. We hope this article was beneficial for you.
Related Articles
-
 June 25th, 2024
Getting started with Flowcharts in PowerPoint
Blog Post -
 January 2nd, 2025
How to Turn PowerPoint Slides into Notes
Blog Post -
 October 27th, 2022
How to Change the Data in Charts and Diagrams in PowerPoint for Windows
PowerPoint How To