
How to Use The Laser Pointer in PowerPoint?


Using lasers while presenting your PowerPoint slides makes your delivery much more effective in front of your audience. It helps you channel your audience’s focus on a specific area of your preference on the slide. But, not everyone would want to or even remember to carry a laser pointer device for a presentation. This is where PowerPoint’s in-built laser pointer comes to the rescue. PowerPoint offers a laser pointer that comes in 3 different colors – red, green, and blue. With this, you can skip buying and using a manual laser pointer or external software for highlighting anything you want in your presentations and webinars.
In this article, we explain how to turn on and off the laser pointer in PowerPoint, alter the color of the pointer, the reason behind changing the laser pointer color in PowerPoint, and various useful shortcuts for the laser pointer in PowerPoint.
Table of Contents:
- How to turn on the laser pointer in PowerPoint?
- How to turn off the laser Pointer in PowerPoint?
- PowerPoint laser pointer shortcut
- How to change the laser pointer color?
- Set up slide show shortcut
- Why do people change the laser pointer color?
- Conclusion
How to turn on the Laser Pointer in PowerPoint?
You can also use the laser pointer in PowerPoint using your mouse via a PowerPoint shortcut. This article will discuss how to do it using both the mouse and the shortcut.
1. The first step is to turn on the Slide Show mode on PowerPoint either by using the Slide Show tab or simply clicking F5.
2. You can find the various pointer tools like Laser Pointer, Pen, Highlighter, and Ink Colour selection tool from Pointer Options on the menu that appears by right-clicking on the screen (slide).
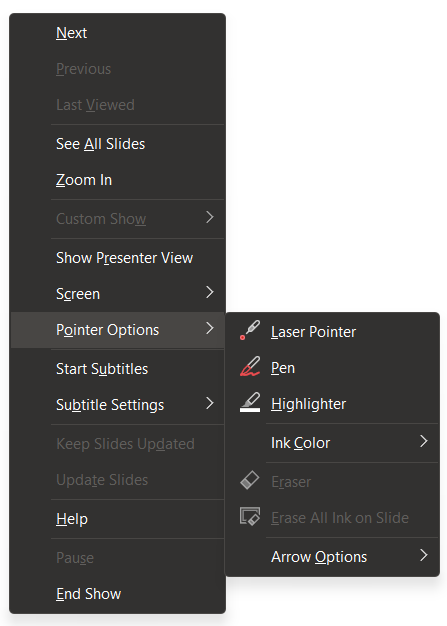
3. You can open the laser pointer tool by clicking on the Laser pointer option. This action turns your mouse cursor into a colored pointer. You can now highlight important parts of the presentation by simply moving your mouse pointer.
4. As we mentioned in the beginning, there are 3 colors you can choose from for your pointer – red, green, and blue. By default, the color that appears when you turn on the laser pointer is red.
How to turn off the laser Pointer in PowerPoint?
Since your cursor become the laser pointer after performing the action mentioned in the previous step, you would be wondering how to turn it off. There are two ways of doing it. The first one is by simply hitting the Esc button on the keyboard. This converts the laser to your cursor arrow. But, this way is practical for people who are near the keyboard.
So, here’s a different way to turn it off.
- Right-click on the screen (slide on the slide show) to find the menu where Pointer Options are available.
- Select the last option on it – Arrow Options
- Click on Visible to turn the mouse cursor into the arrow cursor. This step turns off the laser Pointer in PowerPoint.
Sometimes there’s a bug where the mouse cursor is invisible after selecting the laser pointer. If this is the case, just press the Esc button on the keyboard.
PowerPoint Laser Pointer Shortcut
Are you someone who explains while giving presentations quite often? If yes, then the pointer feature in PowerPoint would probably be a lifesaver for you. Furthermore, it is an added advantage if you know the PowerPoint laser pointer shortcut.
So, here is the shortcut – while on the Slide Show, press and hold the Ctrl key on your keyboard while you click and drag the mouse cursor. This action turns the default red-colored laser pointer on. The laser pointer disappears when you stop holding the Ctrl key or dragging the cursor.
This is a super useful and cool way of using the laser pointer instead of opening the menu and selecting the pointer. Not just because it’s cool to use the laser like that, but it speeds you up without wasting any time opening the menu. So, use the shortcut the next time you go for a presentation!
How to change the Laser Pointer color?
Now that you know how to use the pointer in PowerPoint, it is time to learn how to change the laser pointer color. As we mentioned before, the laser pointer in PowerPoint has 3 different colors to choose from – green, red, and blue. The default red color of the laser pointer can be easily changed into green or blue using the Set Up Slide Show dialog box. Here is the simplified step-by-step procedure.
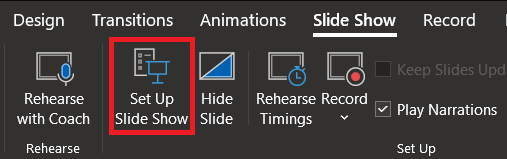
1. Open your Slide Show tab from the PowerPoint ribbon.
2. Click the Set Up Slide Show option from the range of options that load after clicking the Slide Show tab.
3. Click on the Laser Pointer Color drop-down placed on the lower left side of the dialog pop-up box that occurs after the previous step.
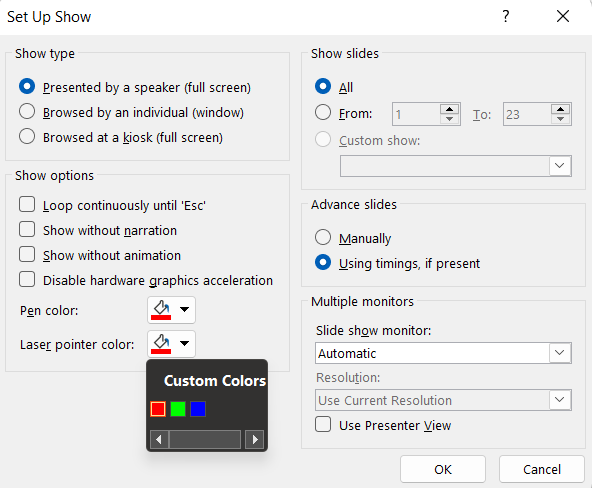
4. Now, select the color you want for the laser pointer from the 3 options that appear- red, green, or blue.
5. Finally, hit the OK button when you are done choosing.
Note that the new color of the laser pointer will remain the same throughout that particular presentation until you go back to edit the settings again. This also means that the color of the laser pointer remains red for all the other presentations you work on at that time until you change it.
Set Up Slide Show Shortcut
Now, you know how useful the Set Up Slide Show dialog box is. What if we told you that you could easily access it with a shortcut? Shortcuts are useful because they save your time and effort. All you have to do is press and hold the Shift key on the keyboard while clicking on the Reading Pane icon at the bottom of the PowerPoint window.
That’s it. Getting the Set Up Slide Show dialog box on your screen is as simple as that. This dialog box is not just important for changing the laser pointer colors, but for executing many other useful PowerPoint tricks as well.
Why should you change the laser pointer color?
There are multiple reasons why one would change the laser pointer color. The basic reason is a no-brainer – a person’s preference to change the color. The most common and logical reason behind changing laser pointer colors is to create a contrast between the slide (the background) and the laser. At times, the background/slide color would be very close to the pointer color (imagine the red color laser pointer trying to highlight a point on a red-colored slide). This is why the contrast between the slide and the laser pointer in PowerPoint needs to be maintained. After all, the idea is to highlight and point out important parts of the presentation to the public.
Conclusion
That’s how you fully utilize the PowerPoint’s in-built laser pointer. We hope this article helps you simplify how you present your PowerPoint slides in front of an audience.
From pointing out different rows in a table, or images of people on your team as you talk about them to emphasizing the key highlights from the slide, you can use the PowerPoint in-built laser for practically anything. You can confidently address a large group of people to present your idea without worrying if they can clearly see the slides or not.
Related Articles
-
 July 28th, 2022
How to End a Presentation
PowerPoint How To -
 September 1st, 2024
How to Create Interactive Polls and Surveys in PowerPoint Using Microsoft Forms
Blog Post -
 January 2nd, 2025
How To Easily Create a Word Cloud in PowerPoint
Blog Post