
How to Proofread Your PowerPoint Presentations

I don’t even need to tell you how embarrassing and frustrating it is to realise that there’s a typo in your slideshow, in the middle of your presentation.
We’ve all been there. So let’s just get this article started. Here’s everything you need to do to ensure you never have typos in your presentations.
Review Content and Structure
I know you’ve been working on your presentation for a while, and reading through it again may seem like a chore. But doing so can not only help you check for errors and typos, but also help you review your content and structure.
When you’re doing this, check if your slides are properly structured, and have a consistent theme, font, and formatting.
Check Spelling and Grammar
Read your content out loud word by word to catch any spelling errors. There are PowerPoint tools you can use to review your slides as well, I will talk about them in this article.
Check your slide titles and headings
Check all your slide titles. Make sure they are clear, concise and accurately represent the content on each slide.
Use the Review Feature in PowerPoint
In PowerPoint, find the Review tab in the ribbon bar.
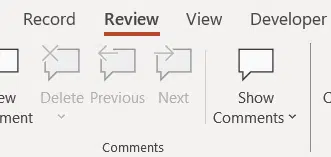
In the proofing section, you can find Spelling. Click on it.
A sidebar will appear with all the spelling errors PowerPoint has found in your slides.
If PowerPoint has incorrectly a word as a spelling error, click on Ignore All, or Add it to your dictionary. You can even change all occurrences of the spelling mistake by clicking on Change All.
PowerPoint will give you suggestions for the word, along with meanings. At the very bottom you have the option to change the language as well.
Convert Your Slides to Text and Proofread
If you’re more used to other proofreading tools where you can simply paste text and check for errors, this step will work for you.
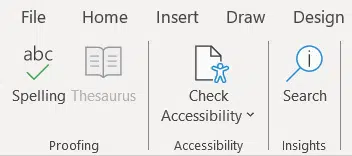
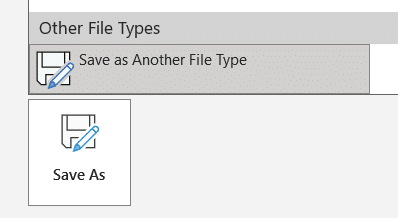
Go to File, click on Export, and click on Change File Type.
Select Save as Another File Type and click on Save As.
Find a place to save your folder, give it a name and next to Save as type, select Outline/RTF.
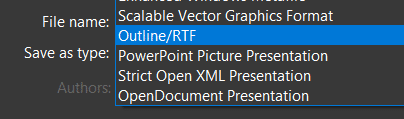
This will save the file as a RTF document, and you can open the file in word, and copy the text to any proofreading tool you want.
This is particularly useful when you’ve got a lot of text on your slides, and if you’re using tools that look for sentence complexity, etc. Of course, you will have to make changes to your original presentations once you’ve found errors.
Review Features in PowerPoint Web
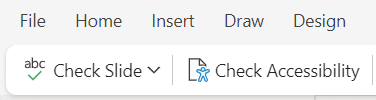
If your PowerPoint file is stored in OneDrive, you can check for errors on the web version of PowerPoint. Go to the Review tab, and click on Check Slide. This will open a sidebar with issues on your slides.
You can also click on the drop-down arrow next to Check Slide to hide all proofing markers if you want.
So there you have it, simple tips and tricks to ensure that your slideshows have absolutely no spelling or grammatical errors. Now you can deliver your presentation with confidence. I hope this article was helpful. Check out SlideBazaar for more useful content on presentations, and for presentation templates!
Related Articles
-
 July 1st, 2024
Hook Your Audience Online: Storytelling Techniques for Slides
Blog Post -
 July 26th, 2022
20 Best Finance PowerPoint PPT Templates for 2026
Blog Post -
 February 28th, 2023
How to Create the Perfect Executive Summary Slide [Examples and Templates]
Blog Post