
How to Make a Collage in PowerPoint?


PowerPoint has always been the best bet for delivering presentations for business or school purposes. But, there are areas where you can be creative with your PowerPoint slides. For example, you can make a photo collage in PowerPoint from scratch. It is a cool way to spice up your slides. All you need to know is to import a set of images to PowerPoint and resize and crop them to create a picture collage.
So, here’s how to make a collage in PowerPoint using a bunch of images.
Table of Contents:
- Why use collage layouts in PowerPoint presentations?
- How to create collage layouts in PowerPoint?
- How to create a mosaic in PowerPoint?
- Tips for creating good PowerPoint collage photo layouts
- Conclusion
Why use collage layouts in PowerPoint presentations?
Suppose you want to add a bunch of images to your presentation without exceeding the number of slides you use. The best option, in this case, is to add them all into a single slide and organize them just like you do for a paper collage or a scrapbook. You can do this using PowerPoint’s picture collage layouts.
Since a collage on a PowerPoint is quite unusual and deviates from what the audience would expect, it can be a great way to create an impression in front of them. This can help keep people interested and engaged while you present.
You can utilize the power of collage layouts in PowerPoint presentations when you want to collate past projects from a design or illustrative work in one place. You can create a collage to present a bunch of photos from an event or showcase images of different products or services you offer using PowerPoint collage layouts.
Ready to use templates for Collage in PowerPoint:
Here are some PowerPoint collage templates that you can customize and use right away:


How to create collage layouts in PowerPoint?
If you have the “Designer” features available on your version of PowerPoint, you can use Design Ideas to instantly create collages of the images in your slide. To know more about Designer for PowerPoint, check out this website.

Click on any of the Design Ideas to instantly convert your images into a collage. If you cannot see this option, try going to the Design tab and click on Design Ideas.

In case you do not have this feature yet, here are the steps to create a collage layout in PowerPoint:
- Open a new blank slide: Add a new blank slide. You can do it by clicking on the Insert tab and selecting the New Slide dropdown to choose a blank slide or press ctrl + M on Windows. Now, you have a clean canvas to work on.
- Insert all images: It is time to load all the images you plan to put on the collage in one place. After ensuring that all the images are kept in a separate folder, you can start the upload process. Go to the Insert tab, click the Pictures drop-down, and choose the This Device option.
- From the browse window that appears, navigate to the folder and click Ctrl + A to select all images. Finally, hit the Insert button to confirm the upload. You can also drag the images to the slide after selecting all (using the Ctrl + A shortcut) instead of using the Insert button. This is why having all the images in a separate folder is recommended, as they are all selected together for convenience.
- Make the photo collage: Your creativity starts from this step onwards. You can begin by resizing all the images on the slide now. Resize them such that they fit well within the slide. You can do it by clicking on an image to select and dragging it with the corner Anchor Points that appear after the selection.
After resizing, you will have to position these images. Positioning can be done by clicking the image to select and then dragging the centre of the image. The way the image needs to be positioned is totally based on your creativity and requirement.
Here, we will mention a few ways to position your images. You can start by implementing these first and later tweak this based on your creativity. You can place all the images side by side for a collage layout with minimalistic aesthetics.
On the other hand, placing the images overlaying each other could give it a creative look. You can use the shapes on PowerPoint and combine photos to create a layered look. Or you can try mixing horizontal and vertical images by positioning them together.
While positioning using any of the ways mentioned above, you can choose the image that needs to be placed on top. Right-click the image and select Bring to Front to place it on top. Similarly, use the Send to Back option to position it behind another image.
Crop images to form a shape
Incorporating shapes into your PowerPoint can be a great way of creating collages. Sometimes you may not have enough space to place an image nor can omit the image completely from a collage. You can place important parts of the image visible by placing them within a shape. This way, using shapes would help you skip using a collage layout.

You can start by clicking on the picture that needs to be cropped into a shape. Now, go to Picture Formats, click on the Crop dropdown on the right-hand side, select the Crop to Shape option, and pick the shape you want.
At times, your desired portion of the image won’t appropriately fit inside the shape. Once you select a shape, you have to adjust the image to crop appropriately within the shape. You will have to click on the image, go to the Picture Format tab, and click on Crop again to adjust by moving the image position within the shape.

Utilize the color saturation setting
This step can make the collage more interesting. You can make a specific image stand out by adding a color overlay to it. This can be done by using the Picture Format tab and choosing a color overlay from the Color dropdown on the left-hand side. You can use your creativity here and play with the saturation and tone, or even go for more color variations.
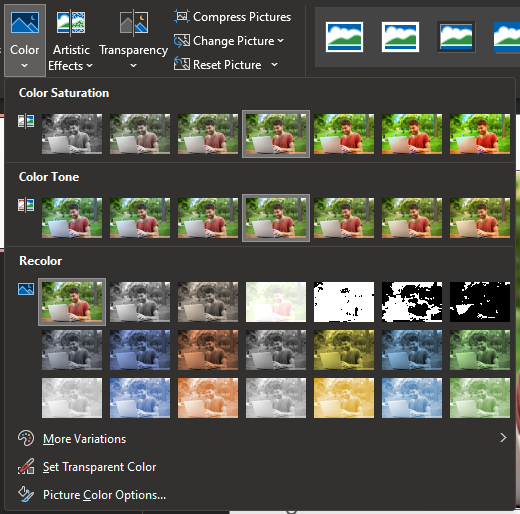
Besides providing room for using creativity, color overlays are useful when you are using a lot of photos with huge tone or saturation differences. Using color overlays makes those images with different saturation or tonality less odd together. In fact, it can make them look cohesive.
Work on the final touches
After positioning the images as per your wish, cropping them appropriately, and using shapes to make them look different, you need to save it and take a break. Yes, you have to take a break or do something else and then come back to the presentation. This time, you will be able to see blank spots or any shortcomings in the collage you made. You can adjust the collage with your new set of ideas, add more images if you want, or try a different layout.
Pro tip: Duplicate what you already created and then tweak the duplicate version. This will be helpful if you don’t end up liking the changes you made; at least you will have the initial version intact. This can be done by simply right-clicking on the slide and selecting Duplicate Slide.
How to create a mosaic in PowerPoint?
One way to make your PowerPoint collage appealing is to create mosaic collages. Read the following steps to create mosaics on PowerPoint:
You can start by inserting all the images.
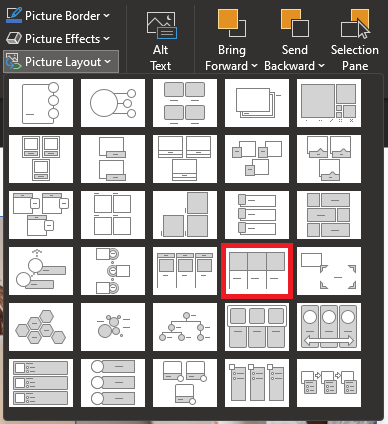
Now, go to the Picture Format tab, and select the Picture Lineup option from the Picture Layout.

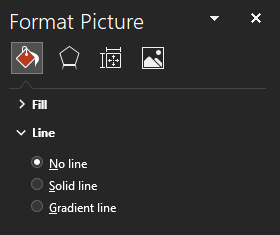
Right-click on images to select Format Shape. This will open a menu with multiple functions on the right side of the window.
Go to the Fill & Line option (the first icon) and select the No line radio button under the Line option.

Now, select all the images and press Ctrl+Shift+G so that all of them get ungrouped.

You can now use Delete to remove all lines and boxes that are unwanted.
You can remove the outlines by selecting all images using the Ctrl+A shortcut and the Shape Outline dropdown on the right side to choose No Outline.
Once grouped, use Ctrl+C to copy and Ctrl+V to paste after clicking on the grouped image. After making copies and pasting them onto desired positions, you can build a mosaic on a PowerPoint slide.
Alternatively, you can use Ctrl+D to duplicate the image group instead of copying and pasting them.

You can repeat and experiment with more pictures to create an even more advanced collage.
Tips for creating good PowerPoint collage photo layouts
After implementing all the techniques mentioned above, you can consider the following tips to tweak what you have already created.
Tip 1 – Couple photos with similar style and tonality: The collage looks good when you pair images with similar tones and styles. For instance, coupling light images with other light images looks good rather than placing a dark image along with a light image.
Tip 2 – Pair similar shapes: Cropping images to shapes makes the PowerPoint collage look good. It is so much better looking when you combine shapes that are similar to each other. For instance, combining a square and rectangle or combining a circle and an oval shape looks cohesive and aesthetically pleasing.
Tip 3 – Use minimal text: Less is more. Using minimal texts on the slide makes it look less cluttered. If the text isn’t kept minimal on a slide, it can remove the collage’s focus. Note that using text isn’t advised while creating collages. But, if there are instances where you can’t skip to convey information, remember to keep it minimal.
Tip 4 – Alternate photos and text: You can tame down your photo collages and make them look minimal by alternating photos and text. This also works well when you have limited photos to build a collage.
Conclusion
Now, you know how to make a collage in a PowerPoint and a mosaic collage in PowerPoint. Start using them in your presentations to stand out and create the best impression in front of your audience.
Image credits:
Images by cookie_studio, Drazen Zigic, Freepik on Freepik
Related Articles
-
 April 22nd, 2022
How To Create the Best PowerPoint Presentation Background
PowerPoint How To -
 March 20th, 2025
How to Add 3D Models in PowerPoint: A Beginner’s Guide
Blog Post -
 December 8th, 2022
How to Make PowerPoint Vertical?
PowerPoint How To