
PowerPoint Presenting Tools That Build Confidence and Control


About the author:
Fiona Walsh is a Microsoft PowerPoint MVP, Microsoft Certified Master Trainer, and founder of Empower Presentations. She delivers PowerPoint and Copilot training and presentation strategy for organisations across the world. A Certified Presentation Expert and former Director of Education at The Presentation Guild, Fiona is also a frequent speaker, podcast guest and YouTuber.
Creating polished slides is only one part of presenting well. For many professionals, the real challenge begins when it is time to deliver the presentation. Confidence can dip, timing can drift, and even strong content can lose impact if delivery is not managed well.
PowerPoint includes a set of presenting tools designed to support delivery rather than design. When used well, these tools can help you stay on time, speak more clearly, and manage both the room and the technology with greater confidence.
This article explains how to use PowerPoint’s key presenting tools, with practical examples of when they can be most useful.
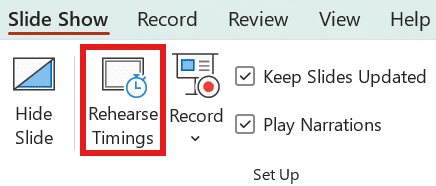
Rehearse timings: taking control of fixed-time presentations
If you have a strict 10-minute time limit and tend to lose track of time while presenting, Rehearse Timings can help. It shows you where your time is going so you can decide what to cut. It is also useful if your presentation is too short, as it helps you identify which slides need more detail or explanation.
Go to the Slide Show tab and select Rehearse Timings. Your slideshow will start. Present out loud and move through the slides as you normally would. When you finish, save your timings.
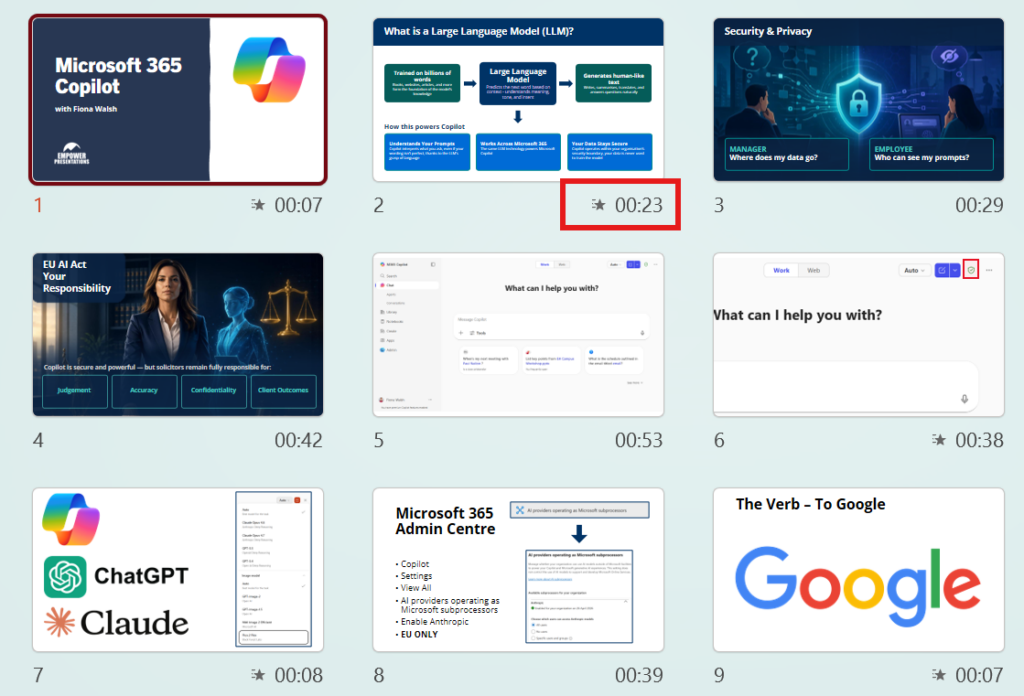
After you have finished rehearsing, go to the View Tab and click Slide Sorter view. Each slide will show the time spent on it. This makes it easier to see where you may need to cut content or where you need to spend a little more time, depending on your target duration.
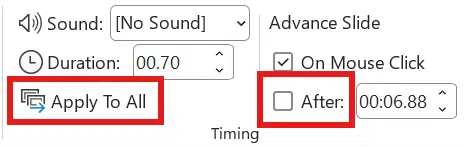
PowerPoint automatically applies slide transitions after Rehearse Timings has finished. These should be removed so the slides advance manually the next time you present. Go to the Transitions tab, clear the Advance Slide After tick box, then select Apply To All.
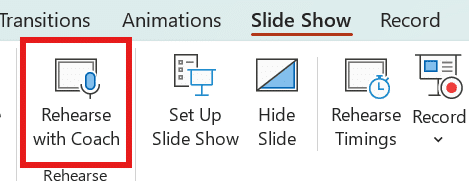
Rehearse with coach: improving your delivery
If you practise on your own, it can be hard to spot habits that affect your delivery. Rehearse with Coach listens as you present and gives feedback on areas such as:
- Speaking speed
- Filler words
- Repetitive phrasing
- Inclusive language
- Pitch variation
You can view feedback as you practise or review it at the end. If you are rehearsing on your own, want clear feedback, tend to speak too quickly when nervous, or want to sound more engaging without changing your message, this tool can help you improve your delivery.
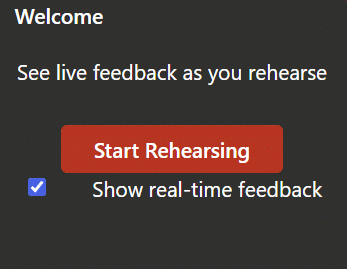
Go to the Slide Show tab and select Rehearse with Coach.
The Rehearse with Coach window opens in the bottom right-hand corner. Clear the Show real-time feedback tick box if you prefer to review the report at the end, or leave it selected if you want live feedback during your rehearsal. Then select Start Rehearsing.
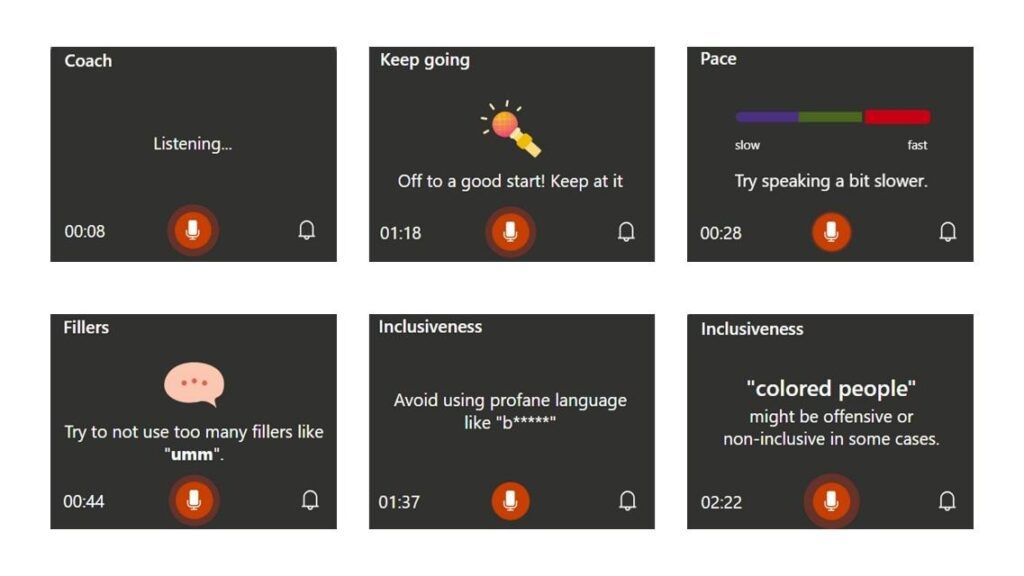
If you choose live feedback, you will see messages appear in the coaching window (lower right-hand corner) as you present. Here are some examples.
At the end of the presentation, the summary report opens automatically.
There are two limitations to be aware of. The feedback summary cannot be saved, and Presenter View is not available while you are using Rehearse with Coach.
Presenter View: your private delivery workspace
Presenter View is a private presenting dashboard that is available when you have a second screen connected to your laptop, such as a desktop monitor, meeting room display or conference screen. To use it, go to the Slide Show tab and tick Use Presenter View. If you want to practise with Presenter View on a single screen, press Alt + F5.
Here’s an informative YouTube video. See Presenter View in action in PowerPoint.
If a second screen is not connected, this option may be greyed out. You can also choose which screen shows Presenter View, which will usually be your laptop screen.
When you start the slide show, Presenter View appears on one screen, and the slide show appears on the other. Press F5 to start from the first slide, or Shift + F5 to start from the current slide.
If Presenter View and the slide show appear on the wrong screens, use the display settings drop-down in the top left of Presenter View to swap them around.

If you need to see something else on your PC, select Show Taskbar. You can also end the show by selecting End Slide Show.
You can move through your slides using the forward and back arrows at the bottom left of Presenter View. This area also shows your current slide number, for example slide 20 of 21.

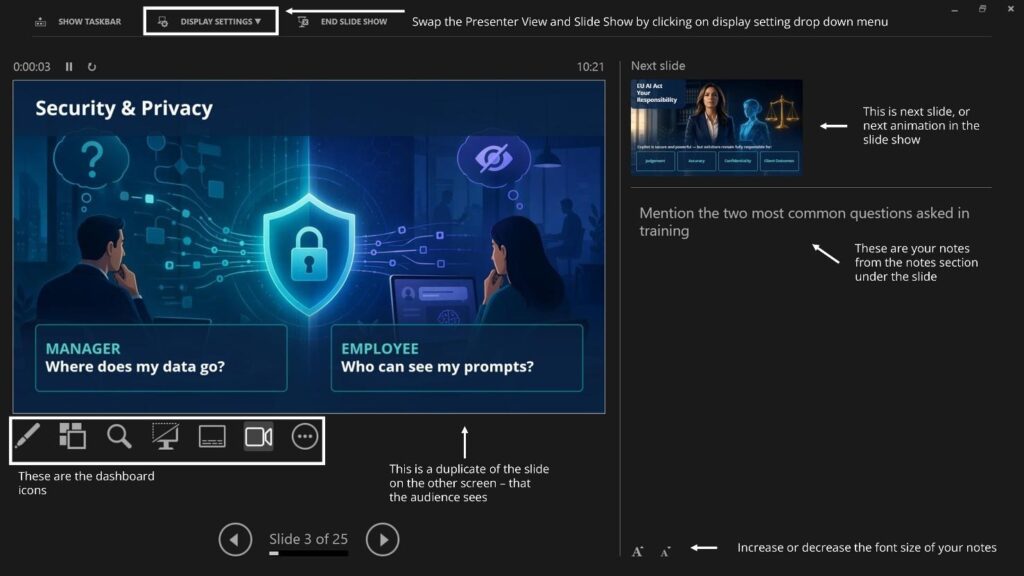
Presenter View also shows any speaker notes added to your slides. You can add notes in Normal view, Outline view or Notes Page view. If you need to make a change at the last minute, you can even edit your notes directly in Presenter View.
Use the large A and small A icons at the bottom centre of Presenter View to increase or decrease the size of your notes.

At the top centre of Presenter View, you can see the current time, which is useful if you need to finish at a specific point. There is also a timer to help you stay on track, and it can be paused or reset if needed.

You can preview the next slide in your presentation or, if you are using animation, see the next animation step on the current slide. You can also use a digital laser pointer by selecting Pen and then choosing Laser Pointer from the drop-down menu. Move your mouse over the slide in Presenter View and your audience will see the pointer on screen.
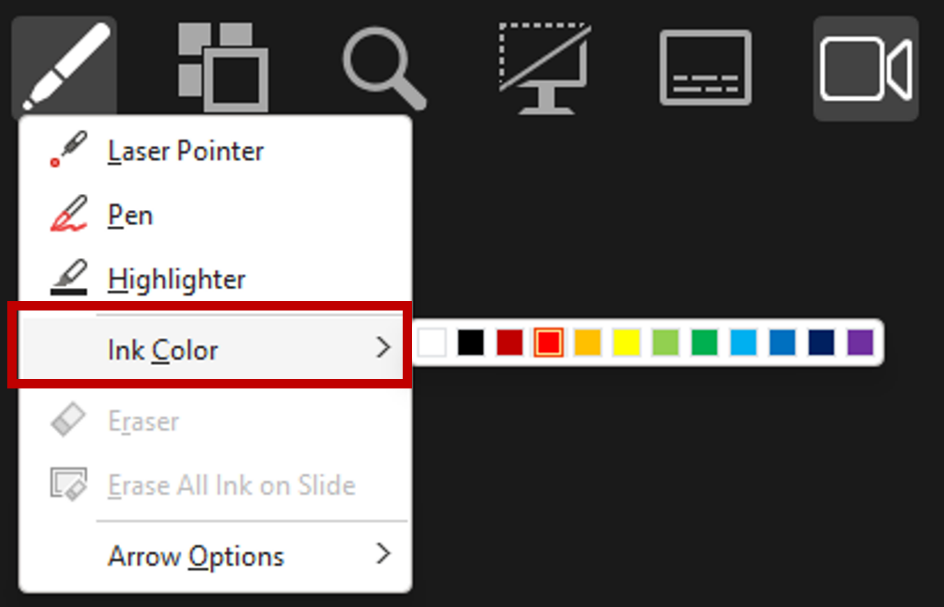
You can also annotate a slide during your presentation. Select Pen and choose either Pen or Highlighter, then use Ink Colour to change the colour if needed. One effective way to use annotation is to complete part of a graph or chart live by asking the audience for their input before revealing the answer.
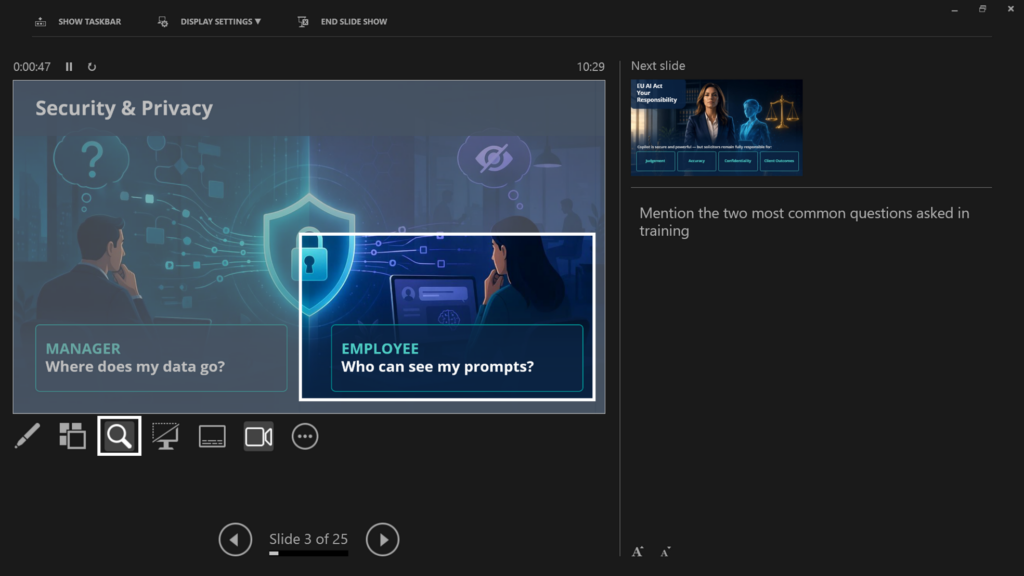
If a slide contains detailed content such as a technical drawing or infographic, you can zoom in while presenting. Select Zoom, move your mouse over the slide in Presenter View, and position the transparent rectangle over the area you want to enlarge. Click to zoom, then use the hand tool to move around the slide.
If you want to pause the focus on your slides and bring attention back to yourself, or a discussion in the room, click the Screen icon. Your shared screen will turn black while Presenter View remains visible on your laptop. You can also press B to black the screen and press it again to return to the slide show. Press W to show a white screen and press it again to return.

The Subtitle button lets you display live subtitles as you speak. These can appear above or below the slide, or as an overlay at the top or bottom.
Here is an example of a slide with subtitles enabled.

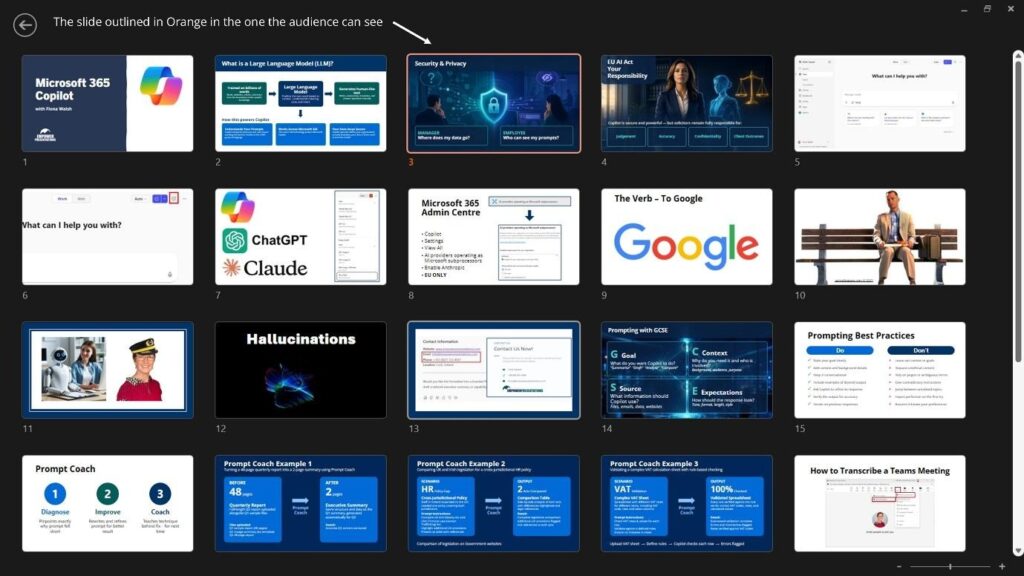
My favourite Presenter View feature is See All Slides. It opens an overview of every slide in your presentation.

This lets you jump to any slide without showing the slides in between. For example, if someone asks to revisit a slide near the beginning, you can go straight to it instead of clicking back through the entire deck. It is also useful if you are short on time and want to skip a few slides without the audience noticing. When you open See All Slides, the slide highlighted in orange is the one currently on screen. Select any other slide to move directly to it. If needed, use the + or – buttons in the bottom right corner to zoom in or out, to see the entire deck.
Used well, these tools can help you present with more confidence, control and professionalism. My final tip is simple: practise before your next important presentation.
Related Articles
-
 June 1st, 2026
How to End a Presentation: Proven Strategies That Leave a Lasting Impression
Blog Post -
 December 22nd, 2022
Best PowerPoint Games & Activities to Get to Know Your colleagues
Blog Post -
 April 12th, 2024
15+ 30 60 90 Day Plan Examples You Could Use in Your Presentation Slides
Blog Post