How to Compress PowerPoint Presentations

Images, graphics, videos, 3D models, etc., can weigh down your Microsoft PowerPoint presentation such that it becomes difficult to send it to someone via email or by any other methods. You will need to compress huge PowerPoint presentations into smaller files in such instances. You can do it by compressing the pictures & videos, deleting image editing data, lowering default resolution, and more. Read on to find out how to compress PowerPoint presentations.
Before you begin, here’s a pro tip: Make a copy of your original PowerPoint presentation prior to performing any of the compressing methods that will be mentioned below. This way, you can cut the risk of losing content from your original PowerPoint presentation. Let’s move on to learning how to reduce PowerPoint file size.
Table of contents
- How to compress a PowerPoint presentation
– How to compress pictures in a PowerPoint presentation
– How to compress videos in your PowerPoint presentation
– Delete image editing data and lower default resolution
– Reduce the character set of embedded fonts
– Clean out the Master Views in PowerPoint
– Slide Master – Hidden graphics
– Handout Master – Hidden graphics
– Notes Master – Hidden graphics
– Replace 3D models - Convert PowerPoint to PDF
- PPT compress it to ZIP File
How to compress PPT PowerPoint presentation files?
-
How to compress pictures in a PowerPoint presentation?
It is a no-brainer that large, uncompressed images used on the slides weigh down your PowerPoint presentation. Compressing these images can make a huge difference in the PowerPoint file size.
Without even touching the settings on PowerPoint, you can simply convert all the images used on the presentation from PNG to JPEG file format externally. This can be done by using an online image compressor and turning all images from PNG to JPEG file formats. But, since this method may not be feasible for many users who work on presentations at a large scale, PowerPoint has in-built options to downsize the file.
You can start by clicking on the image that needs to be resized on the slide, which would make the Picture Format tool appear on the right-hand side of all the ribbon tabs, next to Help.

Under this ribbon, towards the left-hand side, you will find the Compress Pictures option within the Adjust Group.

Click on it to find a popup that offers you two different compression options – Apply only to this picture and Delete cropped areas of pictures.

You can tick the first checkbox – “Apply only to this picture” if you want to reduce the size of just the selected image and not all the images on the slide. Additionally, if you tick the second checkbox – “Delete cropped areas of pictures” you can eliminate the cropped areas of your images that take up extra space on the slide.
Note that once you delete the cropped areas, you cannot edit or return them to their original size.
Besides the compression options, you will also be able to select the image resolution on the popup. Based on your requirement – printing, screen viewing, emailing, projecting, etc. you can choose resolutions that vary from 330ppi to 96ppi.
Finally, click OK to apply the changes.
While you compress and select the desired resolution, do not forget to avoid instances of over-compression that can result in the image looking bad on the slide.
For instance, people often have a tendency to resize images by dragging the edges of the image outward so that it fits the screen or on a larger area. But, when you compress an image first and then resize it, the image could look ugly as the pixel density/resolution decreases as a result.
If you want to compress all the images in future PowerPoint presentations, go to Files, and navigate to find Options.
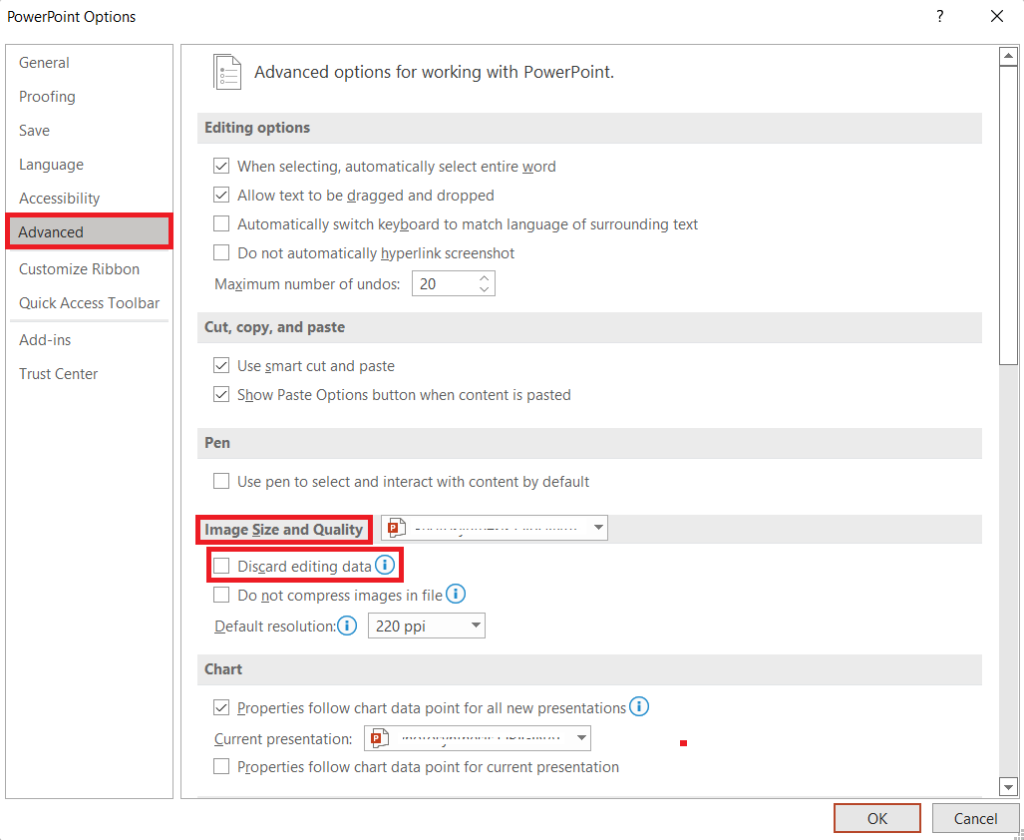
Click on Advanced from the popup window. Scroll to identify the section – Image Size and Quality and tick on the Discard editing data checkbox.

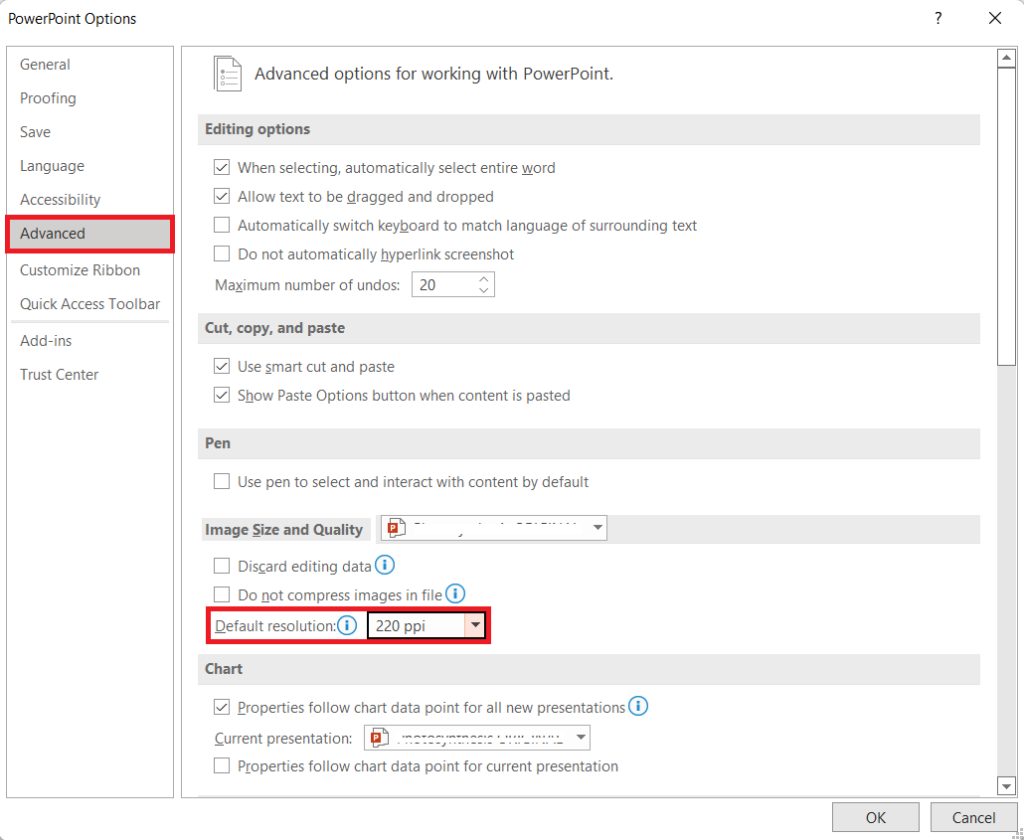
Finally, set the Default Resolution to an appropriate target PPI value (to downsample images) and click OK.
In case you didn’t know, a lower PPI value implies that the image will have lower Pixels Per Inch that indicates lesser display resolution, or pixel density of a digital image.
Low PPI = low image quality = smaller image size.
-
How to compress videos in your PowerPoint presentation?
Having videos in your slides can make your presentations much more entertaining. At times, it comes with the cost of turning your presentations heavy in size. Not adding the videos the right way can make it difficult to share them with someone.
A video can be added to a PowerPoint presentation in two ways:
- Inserting the video link into PowerPoint
- Inserting the video file directly into PowerPoint
To link the video to the PowerPoint presentations, click on Insert ribbon, navigate to Videos on the right-hand side, and browse the video you wish to use.
Finally, instead of clicking Insert, choose Link to File. This way of inserting videos will just create a reference to the video file, rather than adding the file directly to the presentation.
To be on the safer side, note that the video won’t play correctly if the presentation is used on another device since PowerPoint will be looking for the video on the local device and not within the PowerPoint file.
If you insert a video directly into slides, you will be able to compress it if PowerPoint identifies it as a large file. Unlike what you did with image compression, you don’t have to go to Video Format looking for compression options.
Instead, click on File and navigate to Info. Click on the first option – Media Size and Performance to compress media.

Please note that this option will only be available if you have media that can be compressed in your PPT file.
Out of the three options provided (1080p, 720p, & 480p), select the quality you wish to have for the media.
Finally, the progress bar will display the compression progress as it gets completed. Now, you are done with your video compression!
-
Delete image editing data
All the details related to the changes made to images in the PowerPoint presentation are kept within the PowerPoint file. Since our intention is to downsize the presentation, the image editing data must be deleted.
To delete the image editing data on PowerPoint, head on to the File ribbon and click on Options. Click on Advanced from many options on the left-hand side in the popup window. Under the Image Size and Quality section, tick the Discard editing data checkbox.
Also, note that you can select the PowerPoint document where you would like to apply the changes right next to the section. Finally, click on OK to apply the changes. Now, this deletes image editing data from your PowerPoint presentation.
-
Lower image default resolution
Usually, PowerPoint compresses images based on the default resolution set to it in the settings. This default resolution value can be set to a lower value.
This can be done by navigating to the File tab > Options to find Advanced on a popup window that appears thereafter. Select a Default resolution under the Image Size and Quality section from the dropdown which lists High fidelity, 330ppi, 220ppi, 150ppi, and 96ppi.

Finally, hit the OK button to apply the default resolution.
Also, note that the compression action gets applied only to the current file that you work on and it applies only upon saving the file.
-
Reduce the character set of embedded fonts
Across all Microsoft Office products, the non-system fonts will be embedded as the file gets saved by default. So, the PowerPoint file would store a full copy of the entire character set of each non-system font within it. Usage of such fonts and storing such character sets of embedded fonts will increase the size of the PowerPoint presentation. This can be removed by:
- Subsetting fonts
- Removing fonts completely
Subsetting fonts: This process will ensure that only the fonts used within the presentation get stored in the document and not the entire character set of embedded fonts.
Removing fonts: Removing the non-system fonts completely would mean that the places where these fonts were used would change to the use of system fonts. Also, note that this would also have an effect on the layout and spacing.
So, how do you subset or remove the character set of embedded fonts?
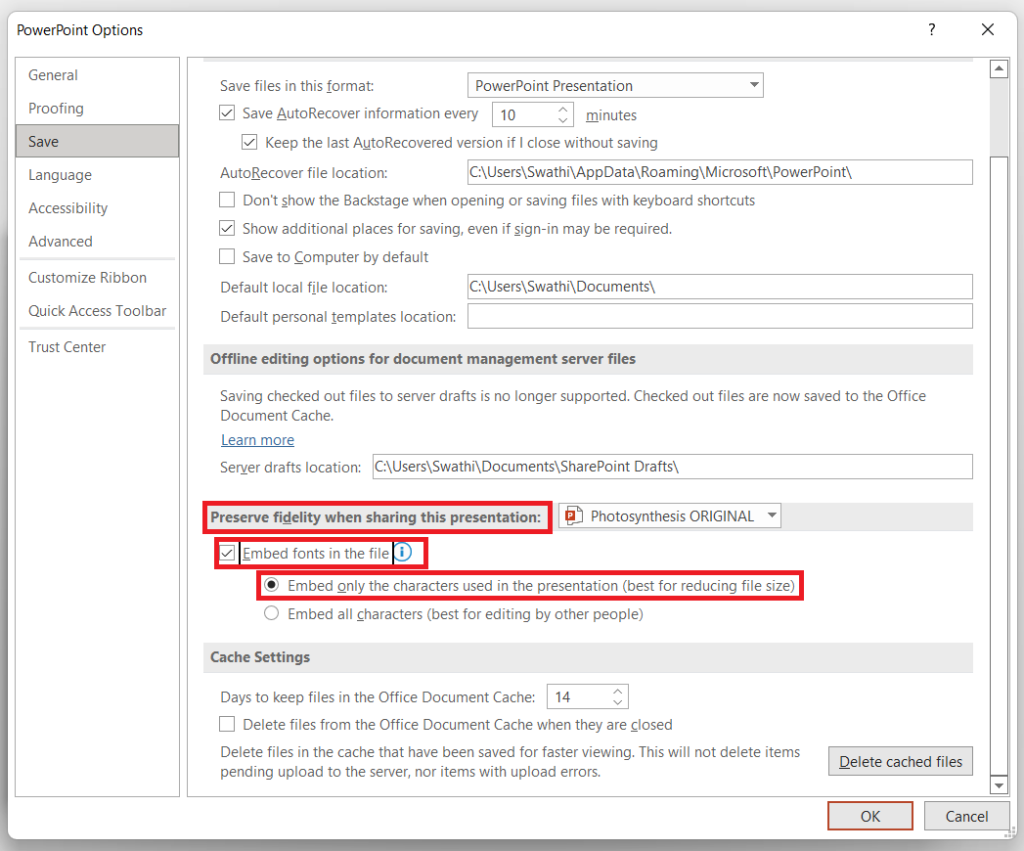
Go to Files > Save as and select the location to save; click on the Tools dropdown placed next to the Save button, and select Save Options.

This opens a pop-up window. Under the Preserve fidelity when sharing this presentation section, tick on Embed fonts in the file and select the radio button – Embed only the characters used in the presentation (best for reducing file size) to subset fonts on the presentation. And, you can untick on Embed fonts in the file if you intend to remove the fonts completely.

Hit the OK button to confirm changes finally.
-
Clean out the Master Views in PowerPoint
Out of the many things that can increase the size of your PowerPoint presentations, there could be hidden and unused elements consuming a lot of space. You can actually remove these first and then see if other downsizing methods need to be implemented. These elements can be usually found in:
1. Slide Master
But, what is Slide Master? PowerPoint presentations come with a Slide Master which is the top slide in a hierarchy of slides that manages slide layouts and the theme for the subsequent slides. The information related to the changes made to it like the change in background color, fonts, effects, placeholder sizes, and positioning gets stored within the slide master.
To clean the hidden graphics in the Slide Master view, navigate to the View ribbon, and select Slide Master under the Master Views group.

Choose the master slide, and click Master Layout. A popup will appear with checkboxes enabling you to either show or hide the title, text, date, slide numbers, or footer placeholders on the slide master.

Tick on the ones that need to appear and untick on the ones that need to be hidden.
2. Handout Master
If you wish to change the appearance of presentation handouts, including the layout, headers and footers, and background, the handout master can be used.
To clean the hidden graphics in the Handout Master view, navigate to the View ribbon, and select Handout Master under the Master Views group.

The subsequent tab that appears will have a Placeholder group, where you can use the checkboxes to either show or hide the Header, Date, Footer, and Page Number.

3. Notes Master
The purpose of the Notes Master is to customize how presentations would look when printed out along with your notes. It basically has two placeholders – one for notes and the other for the slides. Just like the handout master, you can use the checkboxes to either show or hide the Header, Slide Image, Footer, Date, Body, and, Page Number.
-
Replace 3D models in PowerPoint
PowerPoint presentations have a provision to accommodate 3D models within the slide. But, since these are elements that eat up a lot of space, it either needs to be removed or replaced with 2D pictures.
You can start with saving the 3D model into a 2D image by right-clicking the image and choosing Save As Picture from the drop-down menu. Confirm the location where you would like to save the image, name it, and click Save on the dialog box that appears afterward. Now, delete the 3D model and insert this image instead.
Alternatively, you can carry out the same process by first clicking on the 3D model, pressing Ctrl + X to cut it; further, pressing Ctrl + Alt + V to make a special dialog box for pasting appear. Choose a picture format from the options provided – such as JPG, PNG, SVG, JPEG, or Enhanced Metafile and finally click OK to apply the changes.
-
Convert PowerPoint to PDF
A presentation can be downsized by converting the PowerPoint file into a PDF file. You can complete the conversion within 30 seconds. Here’s how: Go to Files > Export, select Create PDF/XPS Document option and click on Create PDF/XPS. Finalize the location to save the file, give it a name, and hit the Publish button.
Here are some additional settings that could be useful for you:
- Under Range, select Current slide to save just the current slide as a PDF.
- Use the From and To boxes in Slides(s) to enter the slide number range and save specific slides as a PDF.
- Use the Publish what section from the Options pop-up window to select Slides, Handouts, Notes pages, or Outline view if your intention is to only save comments, handouts, or outline view and not the slides.
-
PPT Compress it to a ZIP File
Last, but not least, you can straightaway compress PowerPoint to a ZIP File. This may not create a huge difference, yet it can make a tiny contribution to the overall compression methods that are already being applied to your PowerPoint file.
To compress PowerPoint to a ZIP File, head over to the location where the file is saved, right-click the file, select Send to, and click on the Compressed (zipped) folder option. This action completes the process.
Conclusion
Now, you don’t have to worry about sharing that PowerPoint presentation via email or encounter trouble in uploading it on Dropbox. We hope you found these tips and tricks to reduce your PowerPoint file size useful.


