Essential Tips: What You Need to Know About Animations In PowerPoint

PowerPoint has long been the go-to tool for creating effective presentations, but standing out requires more than just visually appealing slides. Using animation in PowerPoint is one of the most effective ways to improve the quality of your presentations. When used correctly, animations may turn a static slide deck into a dynamic, engaging experience for your audience. In this guide, we’ll cover all you need to know about using animations efficiently in PowerPoint.

Understanding the Basics: What Animations Do in PowerPoint
Animations in PowerPoint have two functions: they can either improve the presentation’s narrative flow or, if utilized excessively, cause distractions. Animations’ main purpose is to highlight particular parts of a slide, be it a point of emphasis, a seamless transition between subjects, or just to provide visual appeal.
You may direct the attention of your audience, highlight important details, and keep them interested throughout your presentation by using animations. But it’s crucial to choose the animations carefully, making sure they complement the main idea of your presentation.
The Four Types of Animations in PowerPoint
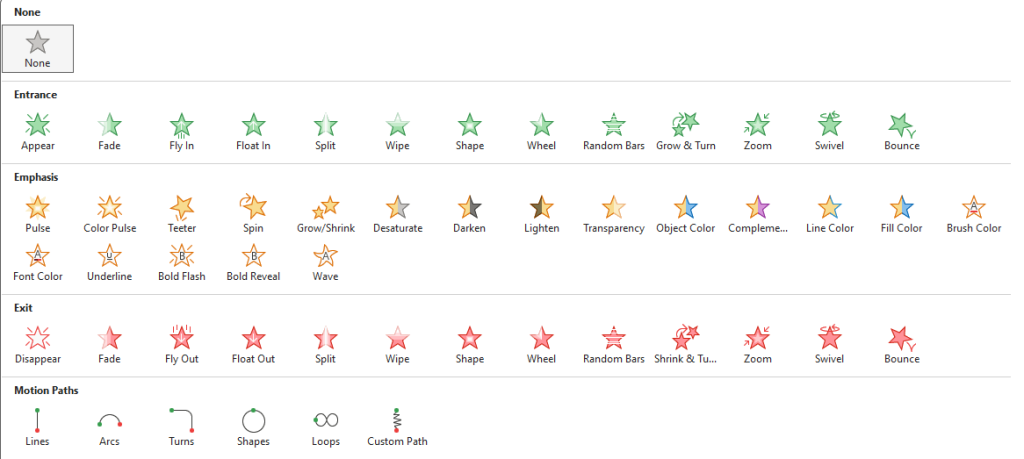
There are four primary categories of animations in PowerPoint, and each has a distinct function. Knowing those types will enable you to choose the perfect animation for your content:
1. Entrance Animations
An element’s entry on the slide is controlled by entrance animations. These are great for presenting ideas to your audience without going overboard. Examples that are often used are “Fade,” “Zoom,” and “Fly In.”
2. Emphasis Animations
Emphasis animations highlight a pre-existing element on the slide. They are ideal for emphasizing particular data without switching to a different slide. Three examples are “Pulse,” “Spin,” and “Grow/Shrink.”
3. Exit Animations
An element’s exit from a slide is determined by its exit animation. Use these animations, such as “Fade Out,” “Fly Out,” and “Disappear,” to gently eliminate points that are no longer the focal point.
4. Motion Paths
Motion paths allow an element to move along a predetermined path on the slide. These are especially helpful in explaining complicated concepts, such as a timeline or a process flow. Typical paths of motion are “Arc,” “Bounce,” and “Custom Path.”
Step-by-Step Guide: How to Add Animations in PowerPoint
If you’re looking for a short tutorial on animating your text in PowerPoint, here’s a video from our YouTube channel that you might like:
Adding animations to your PowerPoint slides is a straightforward process. Here’s how you can do it:
Step 1: Select the Object
Click on the text, image, or shape that you want to animate.

Step 2: Go to the Animations Tab
In the PowerPoint ribbon, click on the “Animations” tab to access the animation options.

Step 3: Choose Your Animation
Select from the range of Entrance, Emphasis, Exit, or Motion Path animations available. You can preview each animation by hovering over it.

Step 4: Customize the Animation
After selecting an animation, use the “Effect Options” to customize its direction, sequence, and duration.

Step 5: Set the Animation Timing
Use the “Timing” section to control when the animation starts and how long it lasts. You can choose to start the animation on click, with the previous animation, or after the previous one.

Step 6: Preview and Adjust
Always preview your slide to see how the animation looks in action. Adjust the settings as needed to ensure smooth transitions and a professional finish.
Making Elements Appear One at a Time in PowerPoint
Content that is revealed in a sequential manner can help you maintain your audience’s attention on one concept at a time. Here’s how to add items one at a time:
Step 1: Use the Animation Pane
Open the “Animation Pane” from the Animations tab to see a list of all animations on the slide.

Step 2: Add Multiple Animations
Assign different animations to each element you want to appear in sequence. For example, you can apply an “Entrance” animation to a bullet point list so that each point appears one after the other.
Step 3: Adjust the Sequence
Drag and drop the animations in the Animation Pane to reorder them according to the desired sequence.

Step 4: Set Timing Options
For each animation, choose whether it should start on click, with the previous animation, or after the previous one.

Tips for Using Animations in PowerPoint
Animations can improve your presentation, but you should only use them judiciously. The following are recommended practices to keep in mind:
Tip 1: Keep It Simple
Avoid using too many different animations on a single slide, as this can overwhelm your audience.
Tip 2: Match the Tone of Your Presentation
Make sure the animations complement the presentation’s overall tone and objectives. Simple animations like “Fade” or “Wipe” might be more acceptable for a serious corporate presentation.
Tip 3: Test for Consistency
Keeping a professional appearance requires consistency. Throughout your presentation, stay with one or two animation styles.
Conclusion
When utilized properly, PowerPoint animations are powerful tools that may greatly improve your presentations. You may provide your audience with a dynamic and captivating experience by being aware of the different kinds of animations that are accessible and following best practices. Carefully choose animations to make all the difference, whether you’re guiding your audience through complex concepts or just providing visual appeal.


